Looking for a simple weekend project that is useful, inexpensive, and looks great in almost any room? In this DIY project, we’ll build a clean and minimalist wooden wall shelf using basic materials and tools. This project is suitable for beginners and can easily be customized to match your space.
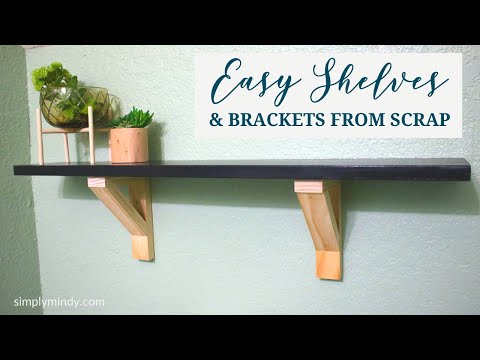
The video above walks through the entire project step by step. If you prefer following written instructions, the complete guide is below.
What You'll Need
- One wooden board suitable for the shelf
- Two wall brackets
- Wood screws
- Wall anchors appropriate for your wall type
- Sandpaper
- Wood stain or paint (optional)
- Wood finish or protective coating (optional)
- Measuring tape
- Pencil
- Drill and drill bits
- Screwdriver
- Level
Choosing the Wood
Almost any suitable piece of wood can be used for this project. Pine is inexpensive and easy to work with, while hardwoods such as oak, maple, or walnut can produce a more substantial finished shelf. If you are reusing an old board, make sure it is structurally sound and free from major cracks, rot, or damage.
Before cutting or drilling, inspect the board carefully. Remove any protruding nails, staples, or other hardware. If the board has been stored for a long time, allow it to acclimate to the room where it will be used before finishing it.
Step 1: Measure and Plan
Start by deciding where the shelf will go and determining the desired length and depth. Measure the available wall space carefully and consider what you intend to place on the shelf.
Mark the desired dimensions on the board using a pencil and measuring tape. Take your time during this stage because accurate measurements will make the rest of the project much easier.
Step 2: Cut the Board
If your board is not already the correct size, cut it to the desired length using an appropriate saw. Secure the board firmly before cutting and keep your hands away from the cutting path.
After cutting, check the ends and edges. If necessary, make small adjustments so that the board has clean, straight edges.
Step 3: Sand the Surface
Sand the entire shelf, paying particular attention to the edges and corners. Begin with a relatively coarse sandpaper if the surface is rough, then move to a finer grit to produce a smoother finish.
Don't forget the corners. Slightly rounding sharp edges can make the shelf more comfortable to handle and can also give the finished project a more polished appearance.
Step 4: Apply the Finish
At this stage you can leave the wood natural, apply a stain, or paint it to match your room. If you choose to stain or paint the shelf, work in a well-ventilated area and follow the manufacturer's instructions for drying time and application.
Applying a protective finish can help protect the surface from moisture, scratches, and everyday wear. Allow the finish to dry completely before installing the shelf.
Step 5: Position the Brackets
Turn the shelf over and determine where the brackets should be positioned. Keep the brackets sufficiently far apart to provide stable support while leaving enough room for the objects you plan to place on the shelf.
Mark the screw locations carefully. A measuring tape can help ensure that the brackets are positioned symmetrically.
Step 6: Install the Shelf
Before drilling into the wall, determine what type of wall you have and select appropriate hardware. Different walls require different types of anchors and fasteners.
Use a level to make sure the shelf is horizontal. Mark the mounting locations, install the appropriate anchors if necessary, and secure the brackets firmly to the wall.
Once the brackets are installed, place the wooden shelf on top and secure it according to the bracket manufacturer's instructions.
Step 7: Check the Finished Shelf
Before placing anything valuable on the shelf, check that all screws are tight and that the shelf is firmly attached to the wall. Apply gentle pressure to confirm that there is no unexpected movement.
Finally, step back and check the shelf from different angles. A small adjustment to the bracket position can make a noticeable difference to the finished appearance.
Ideas for Customizing Your Shelf
One of the best things about a simple wooden shelf is how easy it is to customize. You can use different types of wood, experiment with stains and paints, change the bracket style, or build several shelves in different sizes.
A natural wood finish works particularly well for a minimalist look, while painted shelves can introduce a stronger accent color. You can also use reclaimed wood for a more rustic appearance.
Safety Tips
Always use appropriate protective equipment when cutting, drilling, sanding, or finishing wood. Keep your workspace clean and secure the material properly before using power tools.
When mounting anything to a wall, use hardware appropriate for the wall construction and the expected load. If the shelf will hold heavy objects, make sure the mounting system is designed for that weight.
Final Thoughts
This project is intentionally simple, making it a good starting point for anyone interested in woodworking and DIY home projects. Once you've built one shelf, you can experiment with different dimensions, materials, finishes, and mounting designs.
The video above provides a visual walkthrough of the complete project, from measuring and cutting the wood to installing the finished shelf.
Comments
Post a Comment